Crafting

The Sun melts butter and hardens clay….

It has been far too long since I posted here but since the apple cake I’ve been on holiday with my parents (Cornwall – yay!) and been up and down like a zip.

Anyway.  In terms of crafting, knitting and crochet have continued as usual (Christmas is coming people) but a newer activity has been raising it’s head (since the buttons on my red cardi)….. polymer clay.

Yesterday I tried three new techniques and I thought I would share them here.

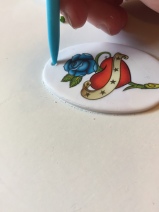
Using temporary tattoo’s on clay.

This is a fairly simple technique using just clay, a tattoo and water.

IMG_0737

Roll out a mixture of white and translucent clay, check that the plaque cutter will fit, and peel the clear cover from the tattoo.

IMG_0738

Place the tattoo face down onto the clay and CAREFULLY wet the back of the paper (not the clay).  Lift the backing paper, I used forceps to avoid leaving fingerprints.  Put a hole at the top if you plan for it to be a pendant, leave this out to make a brooch.

IMG_0746       IMG_0748     IMG_0749

IMG_0750


Using a rose cutter.

A rose cutter is a cutter designed to help you make a rose from fondant icing – but anything that works for icing works for clay.

IMG_0752

Roll out a mixture of translucent, red and red glitter clay (bits and pieces together) until there is enough space for the cutter.  Lift the shape with a blade, this ensures that the next step does not glue the clay to the surface.

IMG_0754

Gently press down the edges of all the rounds with a rounding tool then fold carefully in half.  Roll up, pressing the folded edge rather than the top to leave the petals free.  Spread out the petals to resemble a rose more accurately, then cut off the base of excess clay and place in a tray to bake.

IMG_0757  IMG_0758

IMG_0759  img_0760.jpg


Using a flower mould.

A silicone mould again designed for fondant is the third technique I tried this week. First I dusted the inside with cornflour, to make sure the clay would come out.

IMG_0761     IMG_0762

Using the same mix of clay as the cutter roses you need to make sure that the clay is very warm and flexible.  Press the clay into the mould then use a blade to slice the clay off level with the top of the mould.

IMG_0763     IMG_0764

Then turn out the flower by flexing the mould and bake.

IMG_0765


Final results.

img_0766.jpg

img_0767.jpg

img_0768.jpg

I feel happy with these results and so I’ve ordered some fancier tattoos and will try with them….. yay!!!

Baking

If life gives you apples, make cake.

I used to bake a lot and have started again recently, using my oven for more than just casseroles (although I do love a good casserole!)

This weekend I tried a recipe from one of my mum’s cook books and wow, it was great so I thought I’d share.

NORWEGIAN APPLE CAKE (with thanks to Mr Marks and Mr Spencer whose cook book we found the original in)

Whisk together 2 good sized eggs and 200 g of caster sugar until thick and creamy.

IMG_0664

Then add 150 ml of milk and 100 g of butter into a pan and melt together, stirring until it is boiling.

IMG_0665

Add the boiling mixture into the eggs and sugar.  Then sieve in 175 g plain flour and 3 teaspoons of baking powder and fold in carefully.

IMG_0668

Grease a 20 x 30 cm roasting tin (I kept back an old butter wrapper to do this – learned well from mum), then pour the batter into the dish.

IMG_0670

I then added a teaspoon of cinnamon, swirling it through the batter so that it was randomly dispersed.  Then peel, core and slice a cooking apple and arrange the slices on top of the batter before sprinkling with 25 g of caster sugar and baking at 180 degrees fan for 25 minutes or until raised and golden.

IMG_0672

This tasted great with a good custard and is also very good with ice cream.

Baking

All sorrows are less with bread…

My bread making goes in phases, the most recent ones guided by a lovely book written by a Doctor from my homeland.

bread book

Dr Morton, as he should now properly be called, was a finalist on ‘The Great British Bake Off’ in 2012.  He blogs at Baking James and is well worth a read, in print and online.


The recipe I use is actually the first one in the book, a recipe for Basic White Bread.  It is a simple ‘no knead needed’ version of bread and it has never failed me.

The new thing for me this time was the LÉKUÉ Silicone bread maker, from Lakeland (the BEST SHOP EVER, and one I’m not really allowed in without supervision – my wallet can’t take it!).

bread maker

This lovely device allows you to mix, prove, knead, rise and bake your loaf in one container – NO EXTRA WASHING UP!!  So.  here is a quick guide to how I did it (can you tell I’m proud of it!)

  1. Weigh and mix the ingredients then leave to rest and grow under a damp tea towel.IMG_0639
  2. Using a wet hand scoop and fold the dough, turning the maker by quarters until it is smooth.  Cover again and leave for a full hour until doubled in size.IMG_0641
  3. Knock back and knead before shaping.IMG_0640
  4. Allow another hour of rising.
  5. Score and bake in preheated oven, at least 40 minutes for a deep gold crust and no soggy bottoms.IMG_0643    IMG_0644


I took the loaf over to my parents and let Mum have the first cut – we did try it before dinner though!

IMG_0645        IMG_0646


So, full marks for recipe and bread maker – I’m getting there!!

Knitting

There is a shade of red for every woman…

Well, start a blog and finish a cardigan…. some day.

Whole Cardigan

This is based on Stefanie Japel’s lovely Shapely Boyfriend Cardigan on knitty.com, find it here: Cardigan

It is adapted for me as I’m much shorter and quite a bit more curvy than the lovely Dr Japel, also I prefer bracelet or elbow sleeves rather than full length ones.  I also edged it in seed stitch rather than the rib of the original pattern.

I chose the yarn (Stylecraft Special with Wool) as I have knit with it before and it works beautifully.  Clear stitch definition, easy to tink and washes too!

The colour was easy too.  As Audrey Hepburn said, “There is a shade of red for every woman.”  I adore red: clothes, shoes and lips.

Probably my favourite part is the buttons.  I’ve recently begun to play with Fimo clay and these buttons are the result.  The knit effect is done by twisting ropes together and I made them into shank buttons by embedding split rings before baking them hard.

IMG_0637

All together a great result.